
In the "Management" tab of the Guest Internet cloud system, just after the "Status" tab, there are a few sections that business owners and IT people should go through to continue the configuration of the WiFi service at the premises.
It is in the "Management" tab that WiFi access codes will be customized and generated, but also check for hotspot availability, change the password when necessary and reboot the system when needed.
Next, is a break down of what you will find in the "Management" tab.
You can also see how Guest Internet software works anytime by visiting the product demo at the link below.
https://demo.guest-internet.com/admin/
Looking at Management inside the Guest Internet admin account
Just below the Status you will find the Management tab. In this section you will customize and generate WiFi access codes choosing the best options to fit your WiFi service. Check hotspot availability, change password and reboot system.
In the "Management" tab on the left as illustrated on the picture below, you will find the following sections:
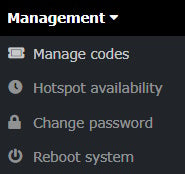
The "Manage codes"
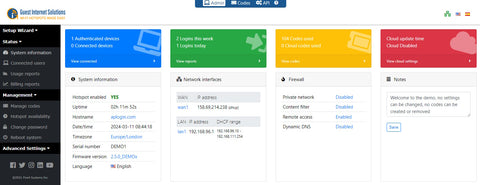
Here is a screenshot of the admin account as shown in the illustration below.
Click on "Manage codes" under "Management" tab to start personalizing the WiFi service as shown in the illustration below.
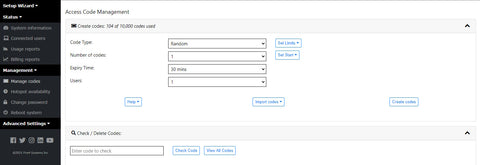
Here, you will personalize the WiFi service to everyone. You can give different WiFi services to different people if necessary, such as remote workers and people streaming videos who need more bandwidth and better speed to enjoy the WiFi service with no interruptions.
The "Code type" option allows you to choose the type of code you want to generate (random, custom, description and MAC address). Select the number of WiFi access codes you want to generate in the option "Number of codes". Definte the expiration time of Internet access in the "Expiry time" option and in the "Users" option you can select how many people will use the WiFi access codes.
Set the limits you find necessary by going through the "Set Limits" and "Set Start" and "Import codes" to generate a list of codes from the options pre-selected during the configuration.
You can print it out the codes using a letter printer or using a Guest Internet GIS-TP1 printer. The WiFi access codes generated will remain active in the system until is used by somebody. Once the code is used, it is then deleted automatically from the system.
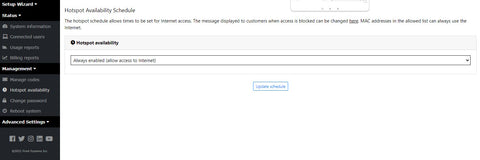
The "Hotspot availability"
In this section you will see the hotspot availability schedule. The hotspot schedule allows times to be set for Internet access. The message displayed to customers when access is blocked can be changed here. MAC addresses in the allowed list can always use the Internet.
This can be seen in the following illustration.
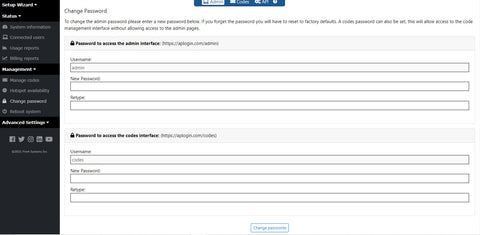
The "Change password"
Change the admin password in this section of the Guest Internet admin account. It is very important that the admin makes a note of the password and keep it somewhere safe. In case the password is lost, then the system will have to be reset to factory default.
A codes password can also be set, this will allow access to the code management interface without allowing access to the admin pages.
Below is a screenshot of the "Change password" section.
The "Reboot system"
If for some reason the system needs to be rebooted, you can reboot the system in this section of your admin account as shown in the illustration below. By clicking on the "Reboot Now" button, the system will be rebooted.
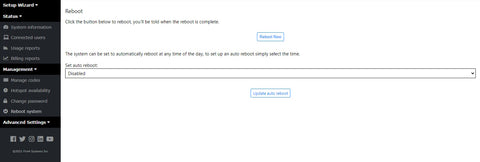
The system can be set to automatically at any time of the day, to set up an auto reboot simply select the time you wish this task to be completed by choosing the best option in the drop down menu.
Guest Internet makes it very easy to customize and generate WiFi access codes for any type of demand you may have.
- It's easy, fast and any person can operate the WiFi service with Guest Internet controllers.
- You can choose between personalizing each WiFi access, set a standard for everyone or simply leave it open.
- Choose how you want to offer your Internet. Offer FREE WiFi at all times, only for the first hour or CHARGE for a better bandwidth and speed for people that rely on fast speeds to get work done.
- Block websites if you find necessary to avoid exceeding the bandwidth usage and keep the WiFi service family friendly.
- Monitor the whole service remotely and make changes fast to the service to improve how your Internet is being used.
There are hundreds of features with valuable options for business owners who want to be in control of their WiFi service.
Remember, that you can change languages (English or Spanish) anytime in the admin account by going to the top right corner of the screen and selecting your preferred language.
Stick around to see what the "Advanced settings" have to offer in a different blog post.
If you have any questions, let us know!