
Setting up a WiFi service with Guest Internet controllers is easy and fast, unlike other products available in the market.
The Guest Internet configuration is user-friendly and only requires proceeding through the easy menus and buttons to complete the configuration of a WiFi service.
This short article shows the first few steps to start the configuration and you can go through yourself and see how it works by visiting the product demo at the link below.
https://demo.guest-internet.com/admin/
Getting started with the Setup Wizard
When a Guest Internet controller is first installed, it is necessary to complete the "Setup Wizard" to add the information needed to get the WiFi service started. You can also choose the preferred language, English or Spanish.
In the "Setup Wizard" menu on the left as illustrated on the picture below, you will find the following tabs:
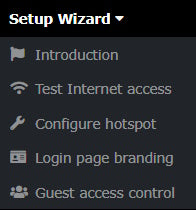
The "Introduction"
First, get started by clicking on the "Introduction" tab, and you will see a screen that looks like the illustration below.
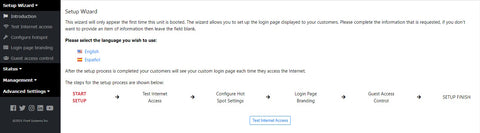
This wizard will only appear the first time this unit is switched on. It allows you to set up the login page displayed to your customers. It is then asked to complete the information that is requested. Select the preferred language, English or Spanish and click on the button “Test Internet Access” to proceed to the next step.
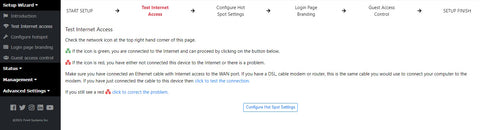
The "Test Internet Access"
The figure below will ask you to test the Internet access so you can proceed to the next step, which is the "Configure Hotspot".
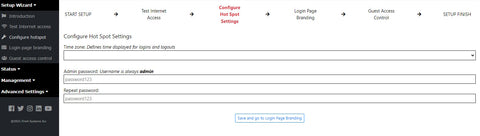
The "Configure Hotspot"
This next figure shows the "Configure Hotspot" tab where you will need to set the time zone and create a password, which will be used to access your admin account every time to need to access your account.
After completing all the steps in "Configure Hotspot" and clicking on the button "Save and go to Login Page Branding", the next tab "Login Page Branding" as shown in the figure below will open so you can continue with the setup.
The "Login Page Branding"

The "Login Page Branding" allows you to customize your login page and you will start by selecting one of the many background options available. If you wish to upload your own background, you can, just follow the steps on the screen.
Then, enter your business information to display to your customers next in the fields provided and at the bottom of the page after scrolling down, optionally enter advertisement message you wish your customers to see every time they login into your WiFi service.
After completing these steps, click on the button "Save and go to Guest Access Control" to go to the last step of the Setup Wizard "Guest Access Control" tab.
The "Guest Access Control"

This is what you will see when you are at the "Guest Access Control" tab as shown in the figure above. Choose unlimited (click to agree to terms and conditions) or controlled Internet access (enter a code). Then, add WiFi instructions in the “Login instructions” field. Click on the button “Save setting and finish wizard”.
Example of a Login Page
The result is that you have created a login page like the example shown below. Creating a login page was never so easy and is a great way to promote your business to customers.

That's it! You have now completed all the steps and have configured the Setup Wizard.
Soon, we will be posting another article about how to configure the "Status" of a Guest Internet controller.
Stay tuned!