
The Guest Internet STAR-3 kit is a wireless expansion kit for the other STAR kits, with two wireless units that are configured as Host or Client.

The STAR-3 kit configuration
The STAR-3 kit contains two WCW-1 wireless products. The two products have three possible configurations where each is configured as a Host (wireless access point) or as a Client (client premise equipment). The antennas are directional, the direction of transmission is shown in the figure.

A point-to-point wireless link
Configure one WCW-1 as a Host and the other as a Client. Install the Host then configure the Client to connect to the Host.

Two Client premise equipment (CPE) configurations
Configure both WCW-1’s as Clients. Configure each Client to connect to the point-to-multipoint wireless access point.

Two Host wireless access point (WAP) configurations
Configure both WCW-1’s as point-to-multipoint wireless access point Hosts with or without encryption for hotspot applications. Devices can connect to the Hosts.

WCW-1 Connectors and controls
Each WCW-1 can be configured as a Host (H) or a Client (C). The Host configuration is a point-to-multipoint wireless access point. The Client configuration is a client premise equipment (CPE).

The Host or Client mode is selected using the switch shown in the diagram. When the mode has been selected then the configuration has to be made by selecting the parameters for that mode.
Connect the computer LAN port to the PoE supply LAN port with an Ethernet cable. The computer LAN port default configuration will be DHCP client.
Using the operating system utility, change the LAN port setting to a static IP address:
192.168.188.10
Verify that the WAN LED is lit on the WCW-1.
Both Host and Client configurations use this setup configuration.
How to set a Windows computer to a static IP address
It is necessary to set the computer LAN port for a static IP address to configure each WCW-1 wireless unit.
Open the settings page, select network and Internet.

Select Ethernet then change adapter options.
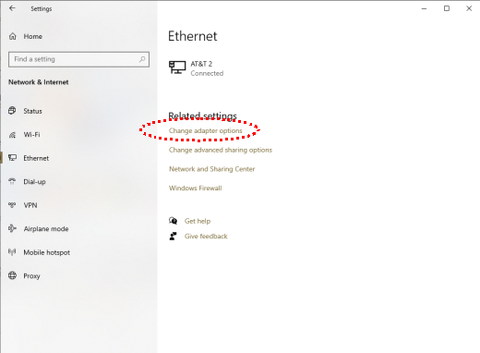
Right click on Ethernet then select properties.

Select Internet protocol version 4 then click properties.

Select use the following IP address
Enter the IP address: 192.168.188.10
Enter the subnet mask: 255.255.255.0
Click the OK button.

Finally click close. The LAN port can now be connected to the WCW-1 products to configure them as a HOST or as a CLIENT.

Host Configuration
Set the switch to ‘H', power the WCW-1.

Open a new browser tab on the configuration computer.
Type the following IP address in the browser tab then press enter.
192.168.188.253
A box will open for the username and password, the default password is ‘admin’, enter the password and click login.
The home page is displayed.

Click the WiFi page icon, see the next figure. Click the 2G WiFi tab.
Set the desired SSID (broadcast name). Note the name.
Set the wireless password (WPA key), the default is 66666666. Click apply.

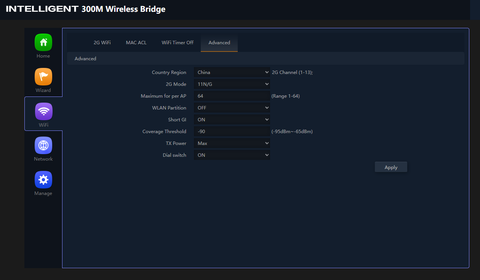
Continue on the WiFi page, click the advanced tab, see the next figure.
Set the country region. Click apply.
Click the manage icon, see the next figure.
Click the modify password tab.
Enter the new password, make a note of the password. Click apply.

Configuration of Host is complete.
Connect the Host to the Internet service; the configuration of the Client will require the Host to be broadcasting the WiFi signal.

Client Configuration
Set the switch to ‘C', power the WCW-1.
Point the Client antenna to the Host antenna.

Open a new browser tab on the configuration computer.
Type the following IP address in the browser tab then press enter.
192.168.188.100
A box will open for the username and password, the default password is ‘admin’, enter the password and click login.
The home page is displayed. This is shown below.

Click the WiFi page icon, the display is shown in the next figure.

Click the tab repeater settings. Click the scan button, select the SSID of the Host from the list by clicking it.
Got to the password box, enter the WPA key that is configured in the Host. Click apply.

Continue with the WiFi page, click the advanced tab. Set the country region. Click apply.

Click the manage icon, click the modify password tab. Enter the new password, make a note of the password. Click apply.

Configuration of Client is complete.
Point-to-point WiFi network configuration with STAR-1 and STAR-3 kits
