
Introduction: How to provide a community Internet service using the Guest Internet STAR-2 kit
Anyone wishing to provide an Internet service to a community requires some technical knowledge to install the infrastructure that will connect the Internet service. Guest Internet makes this easy by providing kits with the parts required and detailed instructions to install and configure the equipment.

The community members who want to connect to the Internet service will use a wireless technology called WiFi. A WiFi network must be installed to deliver the WiFi service to the community members.
If the reader wants to read more and get a deeper understanding of the process to deliver WiFi Internet to community members, we have two free e-books that can be downloaded using these links. The links are also on our website.
How to sell Internet mobile broadband:
https://guest-internet.com/pdfs/How to sell Internet mobile broadband (ENGLISH) - J Barker.pdf
How to start a WISP business:
https://guest-internet.com/pdfs/How to start and build a WISP (ENGLISH) - J Barker 2022.pdf
There are two types of Internet customers
- Mobile broadband: people with mobile devices who connect to a WiFi Hotspot antenna to get Internet access. The mobile users have to be within 100m to 200m of the Hotspot antenna.
- Fixed wireless access: People in homes connect to the WiFi antenna using an antenna on the roof of the home. The roof antenna then connects to a wireless router in the home. Home users can connect over 1Km when there is a clear line of sight from the home antenna to the WiFi antenna.
The network infrastructure that will provide the Internet service to community members has four parts
- The Internet service provider. This is the Internet connection that is shared with community members and can use any of the following technologies; ADSL, cable, fiber, wireless point-to-point, geo-stationary satellite, or low earth orbit (LEO) satellite. The Starlink Internet service uses LEO satellites. Ensure that the sharing of the service with the community is within the terms and conditions of the ISP.
- User controller. This is the Guest Internet controller that will manage the access to the Internet service so that many people can share one Internet connection. Use the Guest Internet product to print vouchers where each voucher has a unique access code with parameters of duration of access, maximum upload and download data speeds, maximum upload and download data limits, and the number of people who can used he code, usually 1. The Guest Internet controller shares the Internet service so that a problem called network congestion is avoided, and also ensures that the ISP data volume limits are not exceeded.
- Point to multi-point (PtMP) wireless access point (WAP). This wireless product broadcasts the Internet access as a WiFi wireless signal. Community members who want to get access to the Internet have to connect to this antenna. This antenna must be visible for any person wishing to connect to it; the connection is called line-of-sight. Any obstruction such as a building or tree will block the signal. Community members with mobile devices can connect to this antenna by selecting the WiFi name. The maximum distance of the connection to a mobile device might be in the range of 100m to 200m.
- Homes are connected with wireless equipment that gives a much longer communication distance. A wireless receiver (called a client premise equipment – CPE) is installed on the roof of the home and points to the PtMP antenna. The PtMP antenna must be visible from the location of the CPE antenna. The distance from the CPE antenna to the PtMP antenna can exceed 1Hm. The CPE antenna connects to a wireless router inside the home and residents connect to the wireless router using WiFi to get access to the Internet.
The network equipment described above is shown in the next diagram. All community Internet services that connect people using WiFi have this design.

A community member who wishes to access the Internet must request or purchase a voucher that has an access code. The person who manages the Internet service prints the vouchers. The voucher is designed using the Guest Internet controller or cloud service and can include a logo plus text. Vouchers are printed on any letter printer. The process of printing vouchers is shown in the next diagram.

A community Internet service is shown in the next figure. The PtMP antenna is installed on a high point in or close to the community so that all members of the community can see the antenna. The installation might be on a hill, a tall building or a tower. When Starlink is the ISP service then the Starlink antenna is installed close to the PtMP antenna also at a high point so that the Starlink antenna has 180 degree visibility of the sky. The PtMP antenna connects to the Guest Internet controller, which controls access to the Internet. The Guest Internet controller connects to the Starlink router. The antenna on each home points to the PtMP antenna.

The installation with the Starlink antenna is shown in the next diagram.

A location that is ideal for the antenna installation may not have power, and so the installation can be powered using solar panels. A solar panel with battery and charger system with a rating of 500 Watts is required to power the Starlink antenna, the Guest Internet controller and the PtMP antenna.
The community member with a mobile device who wants to connect to the Internet service must first get a voucher with an access code.
The next step is to connect the mobile device WiFi to the PtMP antenna by selecting the name of the WiFi (the SSID) using the mobile device.

The next step is to open a browser to see the login page, an example of a login page is shown in the next figure.

The code on the voucher is typed into the login page then the button is clicked. If the code is valid then the person gets access to the Internet.
Contents of the STAR-2 kit
The STAR-2 kit connects to a Starlink antenna or any other Internet service and provides a controlled WiFi Internet service that can be provided for, or sold to a community. The STAR-2 kit shares the Internet service between many people.
There are two products included with the STAR-2 kit:
- The GIS-R2 Internet controller: this controls the Internet access, generates access codes and prints vouchers with access codes that can be sold to members of the community.
- The WAP-1 wireless access point is a powerful outdoor wireless WiFi transmitter that should be installed at a high point for the maximum range of transmission.
The diagram shows how the products are connected together. The Starlink antenna is not included.

First configure the GIS-R2 Internet controller
The GIS-R2 product includes the quick-start guide in Spanish and English. Please read the quick-start guide before proceeding.
Please download the product manual using this link.
https://www.guest-internet.com/pdfs/GIS_product_manual_(English)_1.1.24.pdf
Or open our website and click on the manual link at the top right of the page.
www.guest-internet.com
Have the manual available and consult when you need more information about the steps in this document. This document describes the features required to start providing an Internet service to community residents. There are many other features such as failure monitor that can be enabled. Consult the manual to find out how to configure these features.
The GIS-R2 must be connected to the Internet to configure the product. Connect your computer to the GIS-R2 LAN1 port using an Ethernet cable as shown in the next diagram.

With your computer LAN port connected to the GIS-R2 LAN1 port open the computer browser, type ‘aplogin.com’
The quick start wizard screen will open, like the screen shown in the figure.
First, select the language flag top right, English or Spanish.
Click the button to proceed.


You can add announcements and other information about your service.


Username: admin
Password: set during setup


Installing the WAP-1 wireless access point
- Wireless name (SSID): Hot Spot
- No WPA encryption configured

Configuring the WAP-1 wireless access point
- Change the wireless name that is transmitted, the SSID.
- Add an encryption key to the wireless transmission.
- Change the password to login to the administrator pages.
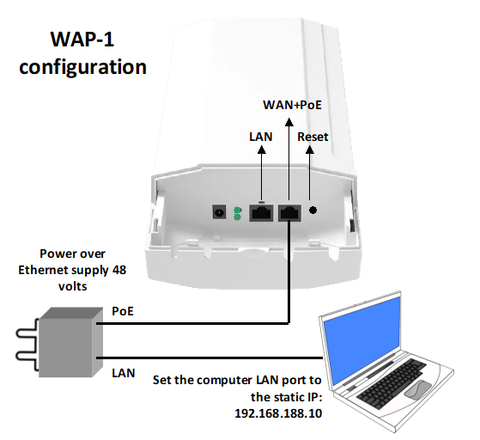


Note that if the password has been lost or forgotten then the WAP-1 will have to be reset to the factory default using the reset button and then reconfigured.

Change your computer LAN port IP setting to DHCP client.
Test the WAP-1 WiFi Internet access when connected to the GIS-R2 and a Starlink antenna

Two methods of voucher access code printing
- Access code vouchers that are printed using the Guest Internet controller can only be authenticated with that controller.
- Any controller in the cloud group can authenticate access code vouchers that are printed using the cloud for a group of controllers.

Printing access code vouchers using the Guest Internet controller.

Select the number of codes (vouchers) to print.
Select the expiry time, 30 minutes to unlimited.
Select the number of users per code; this is set to 1 by default.
The following parameters are optional.
Select the maximum down and up data speeds that the code will allow.
Set the maximum down and up data byte quantity that the code will allow.
Set the start date and start time of the code if it is not to be used immediately.
Click the button ‘create codes’.


Print access code vouchers using your Guest Internet Cloud account.
Click the ‘codes’ menu then select the group that the codes are to be generated for. All Guest Internet controllers assigned to that group will authenticate the codes.

The code generation page is then displayed.

To print vouchers, the code type is set to ‘random’.
Select the number of codes (vouchers) to print.
Select the expiry time, 30 minutes to unlimited.
Select the number of users per code; this is set to 1 by default.
The following parameters are optional:
Select the maximum down and up data speeds that the code will allow.
Set the maximum down and up data byte quantity that the code will allow.
Click the button ‘create codes’.

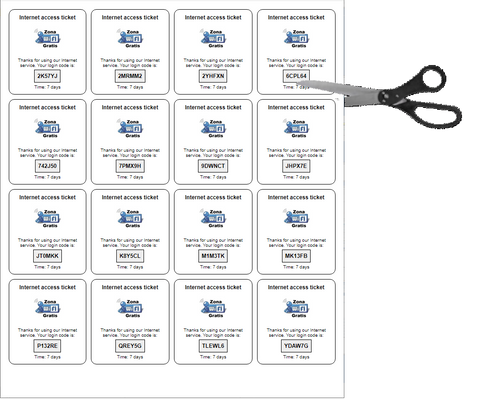
Click the button ‘print codes file’. The vouchers are formatted and ready to be printed on the attached letter printer.

Click the ‘Print' button to send to the printer.
After printing the vouchers can be cut up and distributed.
2 comments
Djasra Eric
Besoin d’informations
zanna mustapha
Hi please i an full video that guide me set up my router or link that i m going to download the config guide